Search This Blog

ad

Showing posts with label Free crochet patterns. Show all posts

Tuesday, March 1, 2011

Introducing Madebycata with a Crochet flower Lid tutorial


Hi everybody!
 I’m Cata from madebycata, and I’m so excited to be Marie’s guest blogger! I feel so very honoured to be here and Marie’s invitation was such a surprise! You see, madebycata is only 2 months old! I started blogging because I wanted to record my little crafty projects and the idea of sharing them with the WWW was just pure awesome! But I actually didn’t really consider what would happen after that! All the comments, followers, it’s just SO amazing and lovely! I really do feel connected to people all around the world in this crafty-lovers-special-understanding way! I never anticipated any of this and I’m loving it! Ha! I didn’t even realize that I could see Stats on my blog!! Imagine my face when I saw the little peaks and bolt countries! What? All this people looking at my tiny blog!?? Madebycata is mainly about Crochet and all about beginners! I only started crocheting last summer and looking for crochet instructions+ideas on the Internet I found all this blogs and websites about handmade crafts! The inspiration is unlimited!! Lately I started venturing into the sewing world as well. Madebycata is also about baking, nice pictures, crafty/inspiring finds and the simple life of this Portuguese girl, married to a Spanish boy and their 2 Irish dogs! Please come check it out!
When Maria contacted me, she mentioned that she liked my pink box. So I’ve decided to make another box for her blog. I adore boxes and I really do believe that we can’t ever have enough of them! Making a crochet lid-cover for a box is really easy. All you have to do is choose a pattern that starts from the centre so you can keep going, around and around, until you have the size you need. The tricky part is when you want your cover to start curling in to make the sides of the lid. This is the way I found it works for me! Give it a go and after this I promise you, there won’t be a lid safe in your house!! Ha!
Crochet pattern inspired by Peach Rose square pattern in this Book

                                            Foundation ring:                                                 
Round 1: At the end join by slst into first sc
Round 2:
Still Round 2. At the end join by slst into 3rd of ch6.
At the end of round 2 you have 8 dc, each separated by ch3
Round 3: Ch1 and then start crocheting into the 3ch space to make the petals
Remember: [ ] means [in the same space or stitch]. Join with slst into first sc. Break off this colour.
              Round 4: Join new yarn between any 2 petals. 1sc in same place. To finish join with slst into1st sc.
              Round 5: ch1 and then follow the picture. Join with slst into 1st sc. Break off this colour.
Join new colour in 2nd dc of any petal. ch1+sc in same place. Follow the picture. Join with slst into 1st dc.
Round 7: Here is when you will turn your- until now- circular pattern into a square by adding corners to it.
Follow the pictures carefully.
Note! Your 1st sc is into the ch6 space
Still Round 7: Make the side and the next corner. Repeat all around.
At the end of round 7 you should have this! Join with slst into 3rd of 3ch.
Round 8: Start with ch3 (works as 1dc) and then 1dc ON TOP of the next 3 dc. The, [3dc,2ch,3dc] in the corner space, and again, 1dc ON TOP of next 4dc
Follow the picture for the side. Crochet all around.
At this point you have your basic square done! Hurray! From here you just need to add rows to make your cover fit your lid. See how my square is a tad smaller then my lid? I just added rows of 1dc,1ch,1dc,1ch...around and around. Note how I did [1dc,1ch,1dc] in the corner spaces.
When my cover was about the size of my lid it was time to start making the sides of the lid. For that you need to decrease so your square starts curling in. You achieve that by crocheting only 1dc at every corner space but also by NOT making some ch1 between your dc on the sides of the square. The amount of ch you WON'T make depends on your own square, lid, yarn, gauge, etc. I didn't do 3xch, evenly spaced, on every side of my square, on every row. Remember, the crochet police will not come in the middle of the night for you! You just have to do whatever you need for your cover to work.
Note! Every dc is made in the space between dc's of the row before.
Keep making sure your square is curling in nicely and check if it's nice and snug on the lid. Decrease less or more as needed. That's it! Your lid cover is done!
Edgings are so pretty and give a lovely finished effect! If you want to add my edging this is how it goes:
Ta-DAH!!! Hope you like your fabulous new box lid and, most important, hope you had fun making it!
Lots of Love, Cata************

Thank you so much for showing us all how to make an amazing lid cover for our box's. This Idea is so creative. If you have not had the chance to stop by her blog please do..she as amazing crochet project ideas and more. I am going to be looking for box's now so that I can start making this adorable crochet lid cover. :) 

Sunday, February 20, 2011

Introducing Little Treasures with a Crochet Necklace Tutorial

Hi! My name's Maya and I blog over at the Little Treasures. My blog is my virtual diary of all the crafty adventures I fling myself into. Come on over and say hi!
When Marie asked me to be a guest blogger I was truly excited. Crochet is something I have plunged into very seriously recently due to my sewing machine having a mild and inactive but curable condition.
So for today's post I thought I might wing a cute, fast and easy project. It involves recycling and crocheting and the ultimate result is gorgeous!
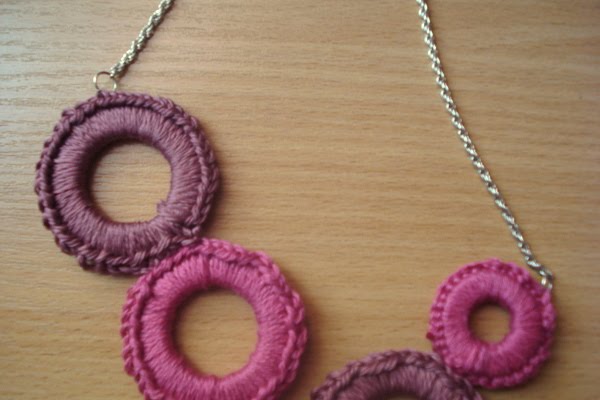
With no further ado - here is my Crochet delight necklace.

For this necklace I used some wooden rings left from a model making project.
I crocheted all around the rings .

As you can see, I used all the pinks and purples for this one! Work on the colors and the design.
When I work on my necklaces I want to step out a bit further and make it unusual so this was no exception. It is tilted on one side. When you finish crocheting, sew the pieces together.


Attach jump rings and that's it!


Your new exciting necklace is finished in less than 30 minutes!


I hope you enjoyed the post! Thank you Marie for the invitation! It was an immense pleasure!

Wow! that is amazing, Thank you Maya I am so glad that you were my guest blogger. 
If you have not visited her blog before I hope you take the time and check it out. she as amazing 

Monday, December 6, 2010

A Crochet Ninja with a Home Made Hair Rollers Pattern

Hi, My name is Maggie Vassie and I am a guest blogger for Marie's Cozy Corner this week. Some of you may know me from my blog, A Crochet Ninja where I wax lyrical about the wool related antics in my life and some of you may know me from my patterns being featured in the UK crochet magazine Inside Crochet, but most of you will probably have no idea who I am so I thought I would blog about how I went from being a casual crocheter to freelance designer.

I have been crocheting for about 8years. My granny taught me how to make granny squares and she said a few weeks ago, “who would have thought that something I taught you to keep you amused for an afternoon would turn into this”
So it all started with a humble granny square, then searching on the net to learn how to do other stitches, getting books from the library and trawling sites like Crochet Pattern Central for the beginners patterns. I’ll admit it was a slow process because there was no one else to share the hobby with (granny lives in Scotland, me in the south of England) I can see through pictures how my work has progressed through the years. Its funny to see how I used to use the cheapest yarn possible and now my yarn fetish is out of control but I suppose that is the natural progressing of any hobby. That and getting “Knit Fast, Die Warm” tattooed on my leg. I‘m a tattoo kind of person and I love this one because it is so me, people who don’t know me personally will know me as the girl that crochets, it’s a part of my personality now.
I saw a quote once that could not be more appropriate to my crocheting lifestyle:
“First you do it for the love, then for your friends and then for the money, That’s why the call us hookers.”
I used to be so adamant that I didn’t want to sell what I made. I felt that putting a price on what I made cheapened what I did. People would tell me that I should sell my Amigurumi, and that I would make loads, but they don’t see the hours of work that go into it. What was worse was people saying “oh! That’s cool, make me one, I can pay you for it”
That drove me crazy, I don’t poop these things out, it takes so much time and effort, if I make you something it’s because you are my friend and I want to spend the time to make you something special not because you can offer me a few quid. I think that is why designing for the magazine worked out so well for me. All I did was write to the editor of the magazine saying “this is what I do, can I work for you?” and they loved it. They send me an email every few months with the themes for the next few issues and I work around them. I’m so thrilled with getting my patterns in print and there are so many bonuses as well, they usually provide the yarn for the project, they keep the final project but I get to keep the left over yarn which is often the best quality they can get hold of and I also get a free copy of the magazine if I am in that issue, not to mention all of the shameless plugging of my site (he he)
I had been put off of selling my things on line for so long, I thought it was so impersonal but I have to admit that I have been turned around on this idea after much research and consideration I will be opening an etsy store in the New Year and staring to write some of the patterns for my book. I am now very much in the frame of mind that if you are good at something, don’t do it for free… Well that’s a lie…. I have set up a stitch and bitch group with the roller derby team to make woollen goods for homeless animal and humans etc, maybe I need to rethink my mantra.
I am currently working on making my Christmas presents, so every free second is spent with hook in my hand. This year I have discovered the wonders of Cowls, they are the perfect gift, modern, fashionable and unisex and most importantly really easy to make.
Well what are my final points for this crochet rant?
  • Stick with it, it takes a long time refine you skills
  • Do it for the love of crochet
  • Tattoos are awesome
  • Have an appropriate mantra
I thought I would share with you a pattern that is perfect for the Christmas season with all the parties and things going on; home made hair rollers. I designed these a while ago for my friend Sally as I don’t have enough hair to warrant any curling.


I used Rowan milk cotton and stuffed them with cotton wool so that if you use them with wet hair they are nice and absorbent. You simply wrap your hair around the fat part, roll it up and tie the strings together, then wait.
You will need:
DK cotton yarn
3.5mm hook
cotton wool
stitch marker
Ch20
R1: 6dc in 2nd chain from hook
R2: inc in every st around (12dc)
R3-14: sc around
STUFF
R15: dec around untill closed
Ch20
Roll in hands to spread cotton wool evenly and Enjoy :)


Thank you Maggie, I am so exicited that you were my guest blogger. your amazing. I can't wait to make this. I am always curling my hair and this looks like a great way to not only save money but also a great way to do your hair. If you have not stopped by her Blog, I hope you do now. Thanks again Maggie. I'll be stopping by shortly. :) 

Thursday, September 2, 2010

Introducing MJM Crafts and Tutorial (Fridge Magnet Dress)

First of all I want to thank Marie for her kindness in inviting me to her "Beautiful Blog".

Hi, my name is Mari. I love to crochet, knit, and craft and I like to be constantly creating. My maternal grandma was a crocheter expert and she made beautiful crocheted designs. I am lucky to have inherited her love for crafting. I have been crocheting since I was a child.

I have been doing some flowers and pdf patterns pot holders, now I am creating beautiful coasters of fruit that you can see at my shop http://www.etsy.com/shop/MariMartin, flowers and other motives coasters coming soon, most of the items are made with 100% Acrylic Yarn for longer durability, wash ability, and better color stability, and other items are made with 100% Soft Cotton Yarn.
I'm happy with this new project… is so easy to create new things… just have to see nature and you will have new ideas, some days ago I was crocheting the coasters, and wanted to put something original, then in this moment a bee came in, and I said that's what I'm going to do to my coasters “a sweet bee”.
You can see more at:
http://mjmcrafts.blogspot.com/
http://www.flickr.com/photos/37731342@N05/

This Tutorial is a Gift for you...!
How to – Tutorial - Fridge Magnet Dress


You can use this design of Fridge Magnet for souvenirs, baby shower, and any other occasion. Easy to make, beautiful and great for your kitchen or as a gift for your friends.

MATERIALS:
yarn white
dark blue and yellow
,magnet
blue and yellow ribbon
 2.00mm crochet hooks
 Acrylic Yarn

FINISHED SIZE: 2.35" x 2.75" - 7 x 6 cms

ABBREVIATIONS:ch = chain
sc = single crochet
hdc = half double crochet
sl st = slip stitcht

WORKING INSTRUCTIONS:Ch 16, sl st to form a ring,
Round 2: sc 16, ending with a sl st.
Round 3: *1 sc, 2 sc in the next st *, repeat from * to *, (24 sc)
Round 4: 24 sc
Round 5: *1 sc, 2 sc in the next st *, repeat from * to *, (36 sc)
Round 6: 36 sc

Skirt
Round 1:
Change color. Attach the white color, make 3 ch, *skip 1 st, 1 hdc, 1 ch*, repeat from * to * 4 times, skip 9 spaces, and work 1 hdc, this hdc connects the 2 sections back and front. Work 4 times: 1 hdc, 1 ch, skip 1 st, 1 hdc, 3 ch turn.
Round 2: 1 hdc in each st around, 1 ch. ending with a sl st. Ch 3,turn
Round 3 - 6: *1 hdc, 1 ch, skip 1 st*, repeat from * to *

Border: Attach other color, *3 ch, skip 1 st, 1 sc*, repeat from * to *Put the ribbon, and stick the magnet on the back.

Thank you Mari for this amazing Pattern, I can't wait to make it my self. :)
I hope that you stop over at her amazing Blog and check it out.

Monday, August 16, 2010

Introducing Marja along with a Circle Granny Square pattern

Hello you all, my name is Marja and I am living in the Netherlands. I am married with Hans. Together we have 4 children, one grandchild and one on it's way.
I do have a lot of hobby's crocheting, knitting, teddy bears, reading, running, cooking and a lot of other things too. You can all read about it on my blog Rosabears
Creating and making new teddy bears is my most pleased hobby. But when there is no inspiration and I want to do something where I don't have to think about other things, then there is my crocheting. That's why I call my chrochetwork my "therapeutic hobby". It gives me, just like gardening, a peacefulness feeling. And this granny pattern is great, because you can use 1 colour or more, and make it such as big as you want. With other colors it's just a whole different granny/plaid/cushion.
I hope I translate the pattern well, because English is not my mother language. But I did my best. When there are questions about the pattern please feel free to ask me about it, and I will try to help you.
slipstich = sl.st.
double crochet = dc
single crochet = sc
Chain 6 slipstich and join to form a ring.
Round 1: 4 sl.st.  (count as 1 double crochet and 1 slipstich) * 1 double crochet into ring, 2 slipstich, repeat from * 6 times.
Join every round ( 8 spaces).
Round 2: 1 single crochet in space, 2 sl.st (first dc), 2 dc in first space, 2 sl.st.
* 3 dc in next space, 2 sl.st. repeat from *
Round 3: 1 sc in space, 2 sl.st., 1 dc, 2 sl.st, 2 dc in same space, 1 sl.st.
* 2 dc, 2 sl.st., 2 dc in next space, 1 sl. st. repeat from *
Round 4: 1 sc in place between two motifs, 2 sl. st., 1 dc, 2 sl.st., 2 dc in same space (corner).
* 2 sl.st., 1 sc in next space, 2 sl.st., 1 sc in next space, 2 sl.st. 1 corner in next space ( 2 dc., 2 sl.st., 2 dc) repeat from *
Round 5: 1 sc in corner space, 2 sl.st., 1 dc, 2 sl.st., 2 dc in same corner space.
* 1 sl.st, 2 dc in next space repeat from * to corner space
1 sl.st, 2 dc, 2 sl.st., 2 dc in corner space etc.
Round 6 (and next rounds): the same as 5th round.
I made one in red/green and beige for my sister, green and beige for myself when it's cold outside and hide away with a good book on the couch. This I call the Giant Granny, because I repeat the 5 th. round may times until the measure is okay.
This one is laying on our bed, 400 granny's, I crochet for this one.
Two different colours beige make this plaid fitting in most interiors.
And even this one is the same pattern. Multi color blue.
I came across Marja's amazing blog and just fell in love with her creations. I know you will to.
Thank you Marja for being my guest blogger today! I look forward to all the new creations
 that you post in your blog. I hope that you go over to her blog and check it out.
Marie

Thursday, June 10, 2010

Crochet Flower Scarf Pattern - designed by Marie

Flower: (make 15)
Foundation ring-chain 4, sl st into 4th chain from hook to make ring.
round 1: * sc, ch 3 into ring. rep. from * 5 times = 6 ch 3 spaces
round 2: sc into ch 3 space four times. countiue to end of round = 6 petals
Round 3: sc into the sc of round one, ch 5. rep. from * 5 more times = 6 spaces
Round 4: *(sc, hdc, hdc, hdc, hdc,sc) into ch 5 space, rep from * 5 more times = 6 petals.
Round 5: *sc st into sc of round 3, ch 6. rep from * 5 more times. = 6 spaces
Round 6: * (sc, hdc, hdc, dc, dc, hdc, hdc, sc) into ch 6 space. rep from * 5 more times = 6 petals.
Round 7: sc into the sc of round 5, ch 7. rep 5 more times. = 6 spaces
Round 8: *(sc, hdc, hdc, dc, dc, tc, dc, dc, hdc, hdc, sc) into ch 7 space. rep from * 5  more times = 6 petals.
Fasten off. weave in ends.

Knitting flowers together - this is where it gets a little bit hard.

attach yarn to the middle of petal of flower, make sure that it's in the back.
*ch 4, sc into sc between petals, ch 4, sc into middle of next petal. rep from * one more time.
ch 4 turn, sc into ch 4 space, rep three more times..rep for three rows. giving you a total of 6 rows.
ch 2, ( sc into middle of petal of the flower that you are attaching) ch 2 sc into ch 4 space.
ch 2, sc into sc between petals, ch 2, sc into ch 4 space, rep one more time. fasten off and weave in the ends, and that is how you join the flowers together.


end rows of scarf and fringe:
okay, to end the scarf into three petals, stitch 10 dc across three petals, make sure that you do this behind the petals. then you are going to ch 3 and turn and rep 2 more rows of 10 dc. now you are going to add the fringe. what I did was decide on a length that I wanted the fringed to be and then tied them on to the end of the scarf. I have a total of 5 fringes, and there you go.


if you have any problems understanding or making this pattern please feel free to contact me and ask questions I hope that you enjoy making this scarf I did. :)
turn and rep row one more time.

LinkWithin

Blog Widget by LinkWithin